Setting up Samba on Raspberry Pi 5
Why a Raspberry Pi NAS
I’d been shuffling files between my MacBook and other devices using cloud storage and AirDrop, and it was getting annoying. I wanted something on my local network — always available, no upload/download wait, no storage limits. A proper NAS like a Synology was overkill for what I needed, so I figured I’d try turning my Raspberry Pi 5 into one using Samba.
Samba implements the SMB protocol, which means any device on the network (macOS, Windows, Linux) can connect to it natively through the file manager. No special client needed. It won’t match a dedicated NAS in performance or features, but for sharing files at home it’s more than enough.
What I Used
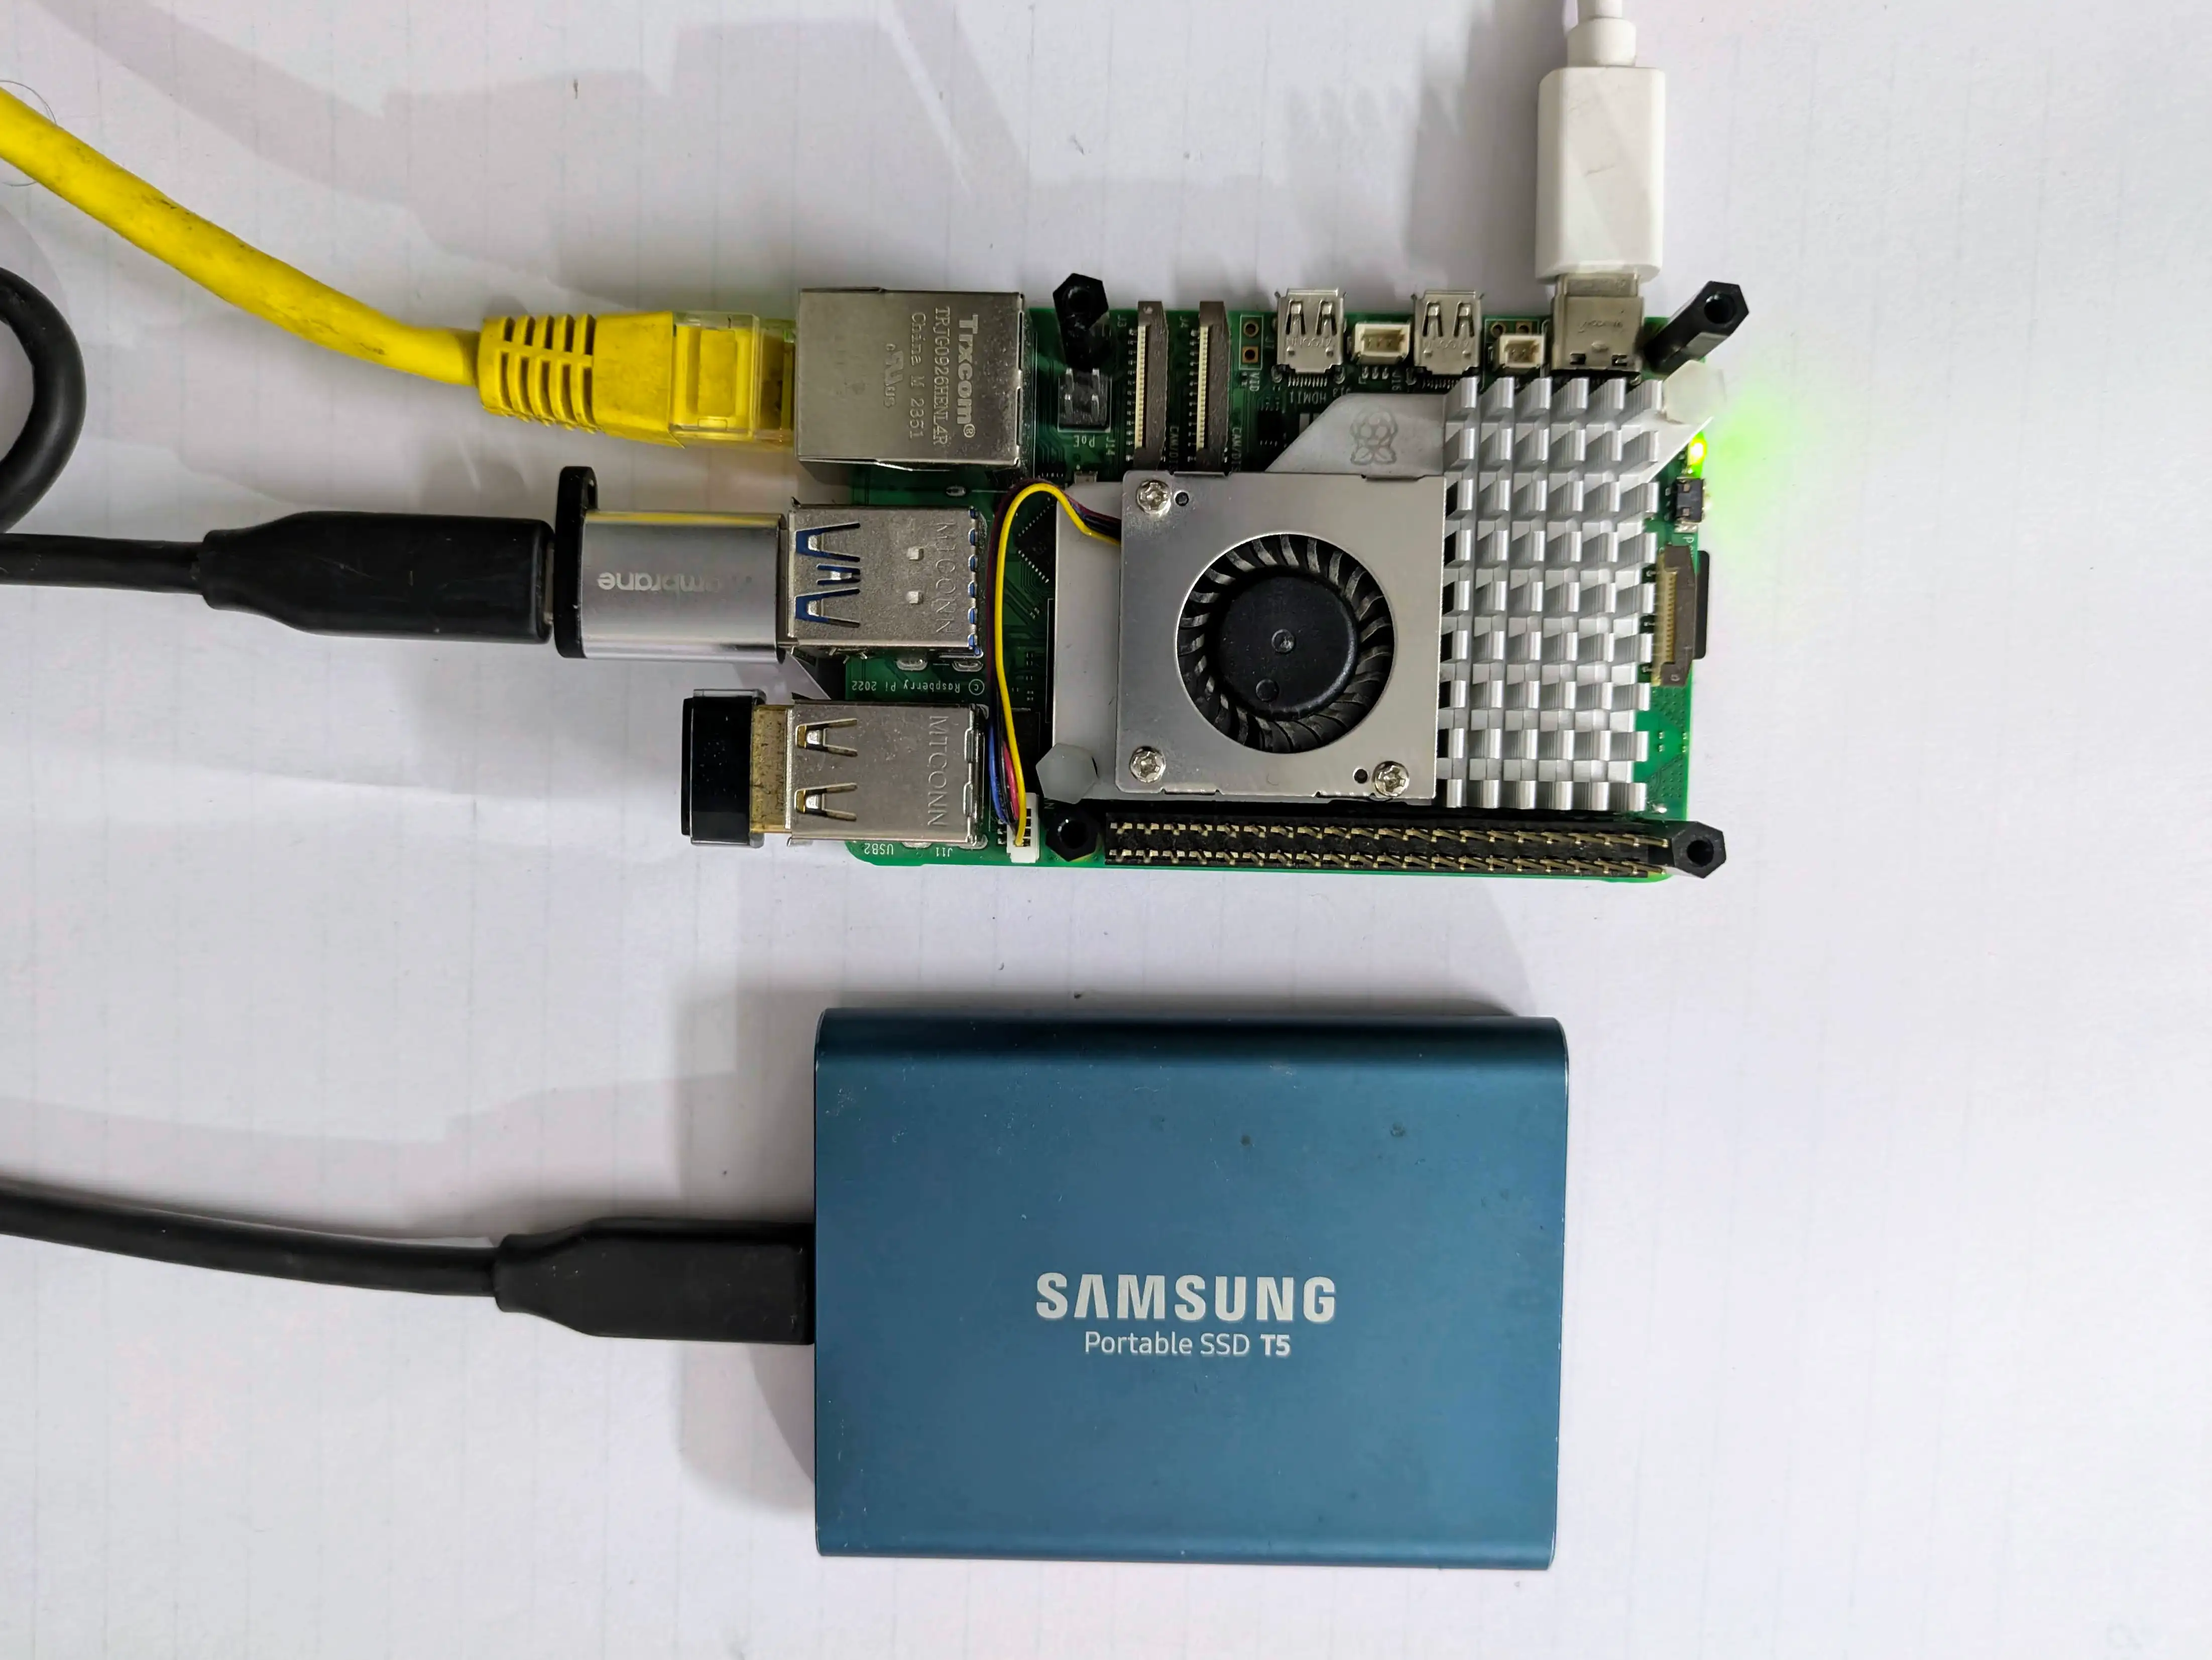
- Raspberry Pi 5 (8GB RAM)
- MicroSD card (32GB)
- Samsung T5 SSD (500GB, connected via USB 3.0)
- Ethernet cable (1 Gbps link to my router)
- MacBook M2 Air (as the client device)
Setting Up the Storage
First thing was getting the SSD recognized and mounted. I plugged it in and ran lsblk to see if it showed up:
NAME        MAJ:MIN RM   SIZE RO TYPE MOUNTPOINTS
sdb           8:16   0 465.8G  0 disk
└─sdb1        8:17   0 465.8G  0 part
mmcblk0     179:0    0  29.8G  0 disk
├─mmcblk0p1 179:1    0   512M  0 part /boot/firmware
└─mmcblk0p2 179:2    0  29.3G  0 part /
There it is — /dev/sdb. The SSD was already formatted as ext4 from a previous project, so I didn’t need to reformat. If yours isn’t formatted:
sudo mkfs.ext4 /dev/sdb1I created a mount point and set up auto-mounting via /etc/fstab so the drive comes back after reboots:
sudo mkdir /mnt/share
sudo blkid /dev/sdb1
/dev/sdb1: UUID="d2fb3a86-6d18-4e3c-876e-005569878cb5" BLOCK_SIZE="4096" TYPE="ext4" PARTUUID="25877b7d-5e70-4880-9bb0-dd17ab64f16e"I grabbed the UUID and added this line to /etc/fstab:
UUID=d2fb3a86-6d18-4e3c-876e-005569878cb5 /mnt/share ext4 defaults 0 2Then mounted it:
sudo mount -aQuick check to make sure it worked:
Filesystem      Size  Used Avail Use% Mounted on
udev            3.9G     0  3.9G   0% /dev
tmpfs           806M  7.9M  798M   1% /run
/dev/mmcblk0p2   29G  3.6G   24G  14% /
tmpfs           4.0G   16K  4.0G   1% /dev/shm
tmpfs           5.0M   48K  5.0M   1% /run/lock
/dev/mmcblk0p1  510M   56M  455M  11% /boot/firmware
/dev/sda1       458G  387G   48G  89% /mnt/share
tmpfs           806M     0  806M   0% /run/user/1000
465GB available at /mnt/share. Good to go.
Installing and Configuring Samba
The installation itself is straightforward:
sudo apt update
sudo apt install -y samba samba-common-bin
I backed up the default config (it’s massive and full of comments) and added my share at the end of /etc/samba/smb.conf:
sudo cp /etc/samba/smb.conf /etc/samba/smb.conf.bak[samba_share]
comment = Samba Share
path = /mnt/share
browseable = yes
writable = yes
create mask = 0755
directory mask = 0755
valid users = piSet the right permissions and created a Samba password:
sudo chown -R pi:pi /mnt/share
sudo smbpasswd -a pi
Restart and it’s live:
sudo systemctl restart smbdThe whole setup took about 10 minutes. Most of the time was spent reading the default smb.conf to understand what the options actually do.
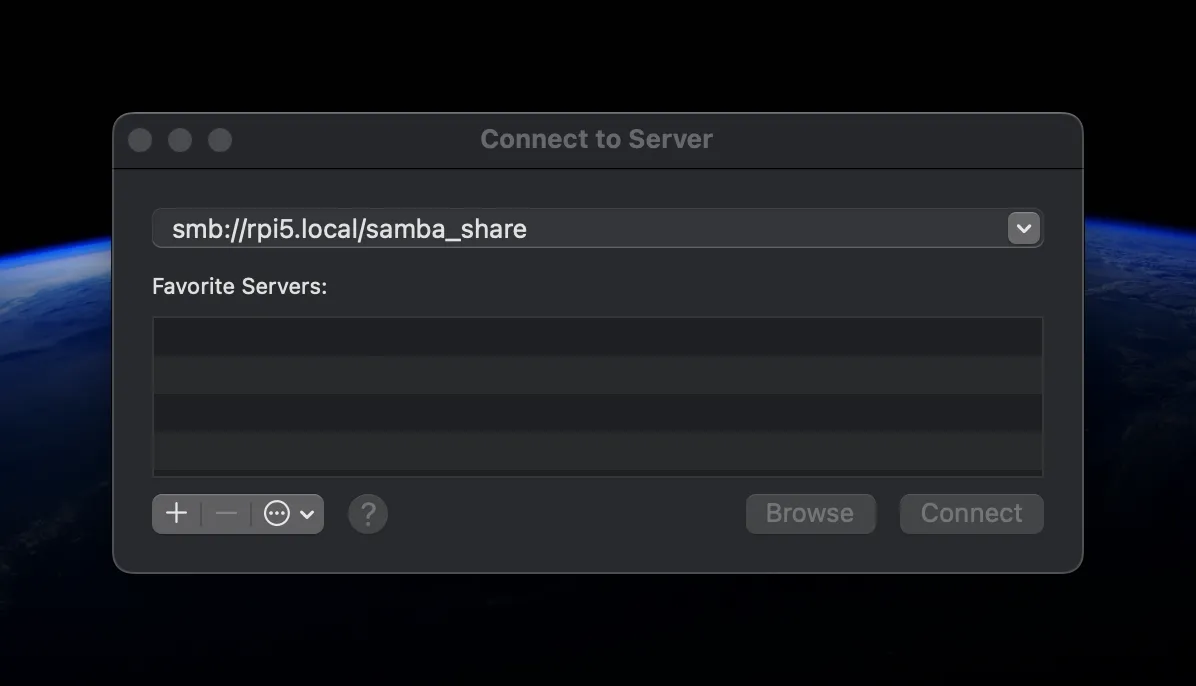
Connecting from macOS
On my MacBook, I opened Finder → Go → Connect to Server and typed smb://rpi5.local/samba_share.
Entered the username and password I set with smbpasswd:
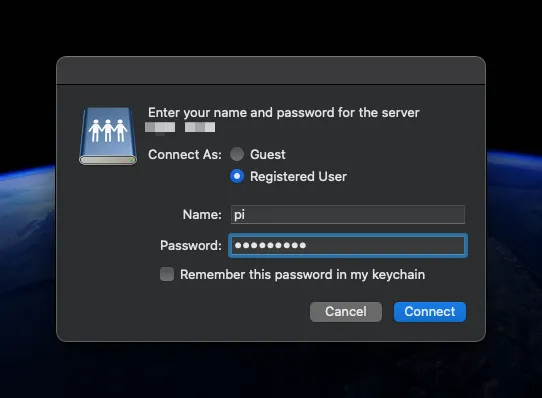
And it mounted. The share showed up in Finder like any other drive. I could drag and drop files, open documents directly — it just worked.
How It All Fits Together
sequenceDiagram
  autonumber

  participant UserDevice as User Device
  participant SambaServer as Raspberry Pi Samba Server
  participant Storage as External Storage

  UserDevice->>SambaServer: Request file/directory list
  SambaServer-->>UserDevice: Respond with file/directory list
  UserDevice->>SambaServer: Request to read/write a file
  SambaServer->>Storage: Read/Write file from/to storage
  Storage-->>SambaServer: File data or write confirmation
  SambaServer-->>UserDevice: Respond with file data or success confirmation
The Pi acts as an intermediary — it handles the SMB protocol and translates file operations to the ext4 filesystem on the SSD. Simple, but effective.
What Actually Happens on the Wire
The diagram above is the simplified version. Under the hood, SMB2/3 has a full session lifecycle — TCP handshake, dialect negotiation, NTLMSSP authentication, then pipelined read/write chunks. Step through the protocol flow below to see every packet:
Benchmarking: How Fast Is It?
I was curious about the actual throughput, so I ran some tests. I wanted to know two things: how fast can it read and write, and does block size matter?
Setup
- File size: 10GB
- Block sizes tested: 1KB, 1MB, 4MB, 16MB, 1GB
- Tool:
dd(crude but good enough for sequential I/O)
# Create a 10GB test file on the Pi
dd if=/dev/zero of=dummyfile bs=1G count=10

# Read test (from MacBook)
dd if=./samba_share/tests/dummyfile of=/dev/null bs=<BLOCK_SIZE> status=progress

# Write test (from MacBook)
dd if=/dev/zero of=./samba_share/tests/dummyfile_write bs=<BLOCK_SIZE> count=<COUNT>
Read Performance
| Block Size | Time | Speed | CPU Load |
|---|---|---|---|
| 1KB | 112s | 92 MB/s | 29% |
| 4MB | 92s | 110 MB/s | 5% |
| 16MB | 96s | 106 MB/s | 5% |
| 1GB | 97s | 106 MB/s | 4% |
Write Performance
| Block Size | Time | Speed | CPU Load |
|---|---|---|---|
| 1KB | 95s | 108 MB/s | 23% |
| 1MB | 94s | 108 MB/s | 2% |
| 4MB | 95s | 108 MB/s | 2% |
| 1GB | 94s | 108 MB/s | 2% |
What I Found
The numbers were surprisingly consistent — about 100-110 MB/s for both reads and writes regardless of block size. The only outlier was the 1KB block size, which pushed CPU usage up to ~29% due to the overhead of handling millions of tiny I/O operations.
The interesting finding was that Ethernet is the bottleneck, not the SSD. The Samsung T5 can do ~400 MB/s over USB 3.0 directly, but Gigabit Ethernet caps out at ~125 MB/s theoretical (and ~110 MB/s in practice with protocol overhead). The Pi’s CPU barely notices the work — 2-5% load for normal block sizes.
For my use case (transferring project files, media, backups), 100 MB/s is plenty. A 1GB file takes about 10 seconds. Good enough.
What I’d Do Differently
Looking back, a few things I’d consider for a more robust setup:
- RAID or backups: Right now it’s a single SSD with no redundancy. If the drive fails, everything is gone. Adding a second drive with
rsynccron jobs would be a cheap safety net. - Access control: My config is wide open for the
piuser. For a multi-user household, setting up separate Samba users with different share permissions would make more sense. - 10 Gigabit networking: If I ever needed more speed, a USB 3.0 to 2.5GbE adapter would bump throughput to ~250 MB/s. But for now, Gigabit is fine.
Conclusion
Turning a Raspberry Pi into a NAS with Samba was one of the easier homelab projects I’ve done. The setup is minimal, performance is limited only by the network link, and it integrates seamlessly with macOS Finder. For simple file sharing at home, it’s hard to beat the cost — about $80 for the Pi and SSD combined.
The benchmarking was the most useful part for me. Knowing that Ethernet is the bottleneck (not the Pi, not the SSD, not Samba) means I don’t need to optimize anything on the software side. The system is already running at the limit of the hardware.